How to prepare the file for mint in remark 2.0
We all know that thanks to RMRK you can create incredible combinations of NFT. But how should the files be prepared in order to be able to do a mint properly?
In this article, I show you how to prepare all the files in order to create nested NFTs and create your own customizable NFT system.
Index
- NFT equipped, nested and multi-resource - Concept
- Equipped NFT, Base and items
- Structure, Index and Export
- Types of files
- Examples of projects
1. NFT equipped, nested and multi-resource - Concept
Remark 2.0 allows you to have NFTs that contain other NFTs, as part of a main one or as a secondary resource. The protocol provides the possibility to work with different files, using them together will make your project Multi-resourced, the files can be: png, jpeg, svg, mp3, mp4, gif, …
By adding a file on top of another file you're composing a new file that will also be a unique NFT.
To summarise, we can say that:
- Nested NFTs: An NFT containing other NFTs
- Multi-resourced NFTs: A nested NFT with different file types.
- Equipable NFTs: NFTs that can be aggregated on another NFT, creating a unique NFT.
For more info about all the specific, take a look at the documentation: https://docs.rmrk.app/concepts
2. Equipped NFT, Base and items
Once a primary file has been generated and a secondary file created and sent to the first, this can be considered as an item in the primary file, and will be visible of the inventory. If the item has been prepared correctly it can be equipped on the primary file.
This is a different concept to combine a main NFT with a secondary resource. Which will be visible by clicking on the neighbouring icon. The secondary resource can be chosen as the primary resource, in which case the preview image will change.
Adding a secondary file to a primary file can be done at any time, if NFT is not in our possession, there needs to be an 'accept file' interaction from the owner.
The relationship between base and items is the starting point for understanding how this functionality works.
The base is the main NFT and is a fixed and immutable element, on which the items are placed. It is also possible to equip items on items.
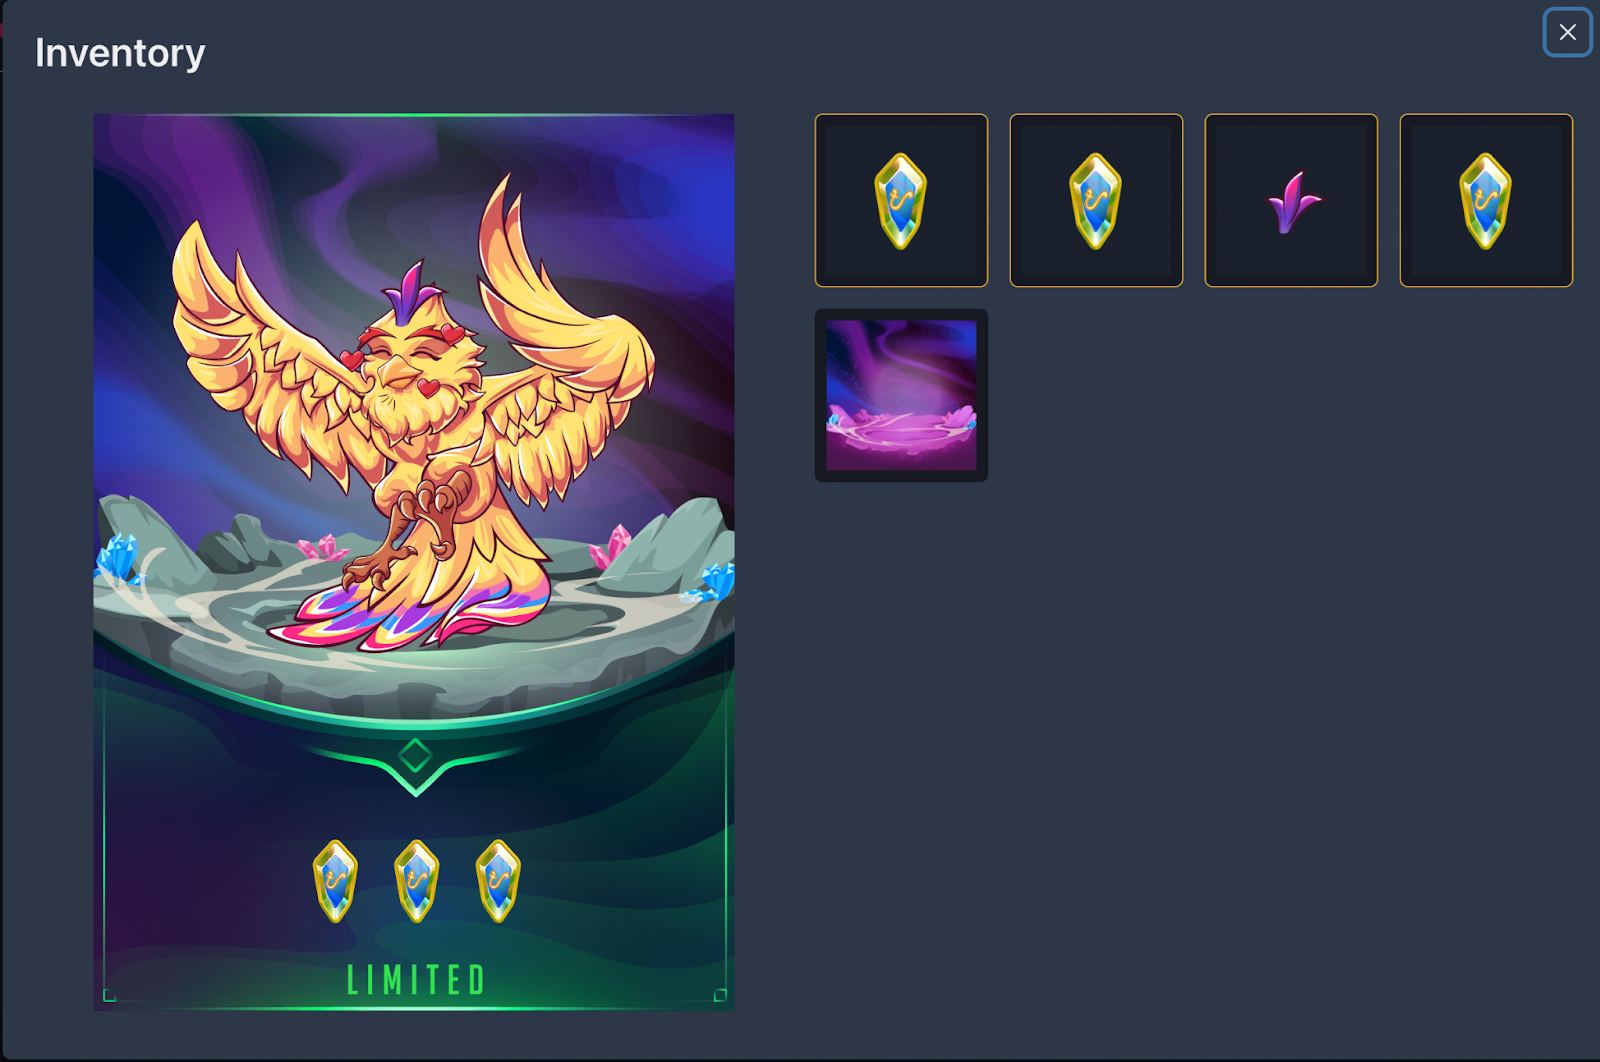
A example is the Kanaria Bird:
- The base consists of the Kanaria in yellow, the Imagen of the island and the card frame. These are fixed elements that can never be changed. What can be done is to equip them with other elements.
- The items are the movable elements, which appear in the inventory, in this case we have 3 gems, a decorative element for the head and a background. As you can see the 3 stones have been added to the main NFT, as well as the pen, while the background has not been added.
When an item is added to the base is used another file, also NFT, which is not visible in the preview, but it is indispensable for the correct visualization of the finished image.
3. Structure, index and export
As we have seen, it is possible to equip a main NFT with a other NFT, it can be done within a collection or on different collections, the important thing is to follow certain rules for the creation of files.
(In the next examples we will use the beautiful Chunky, of which Yuri has made a useful video tutorial on how to mint via script and created a repo on GitHub to use as an example. Here: https://www.crowdcast.io/e/buidl - https://github.com/rmrk-team/rmrk2-examples)
What files we need to be ready for the mint?
The Base:
The base is important because it represents the main elements. These elements can be composed of several parts and have different indexes, and don’t necessarily have to be 0.
Items:
Items are the elements that are design to be added to the base, these elements are also NFTs, which can be seen independently of the base. For this reason the items have at least 2 graphical elements, one for preview and one or more for equipment.

The positioning and generation of the file must be precise, a tip is to position the elements and export the layers separately. The file we are going to export must be within the same frame in which it is equipped.
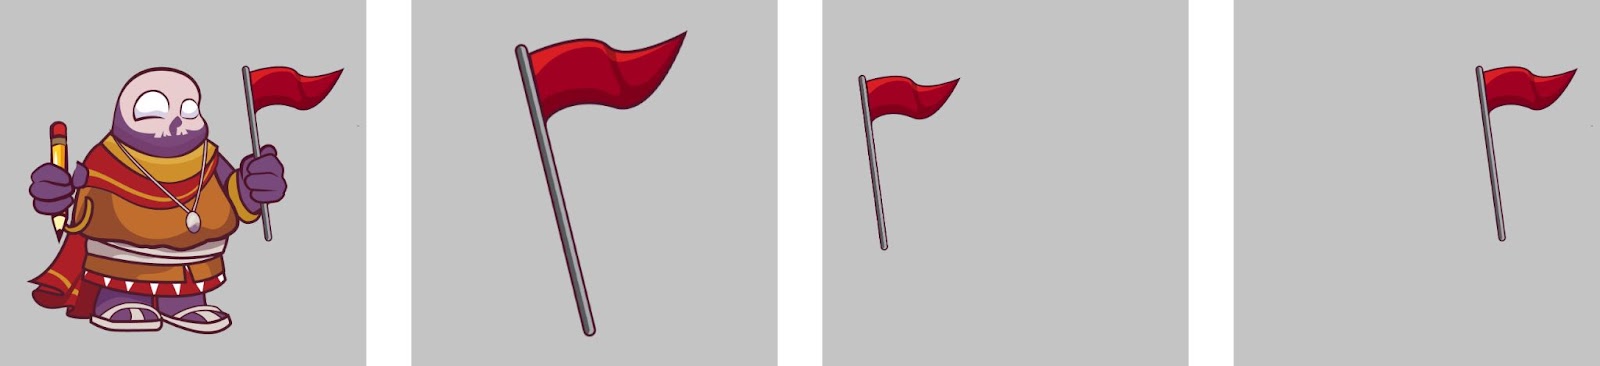
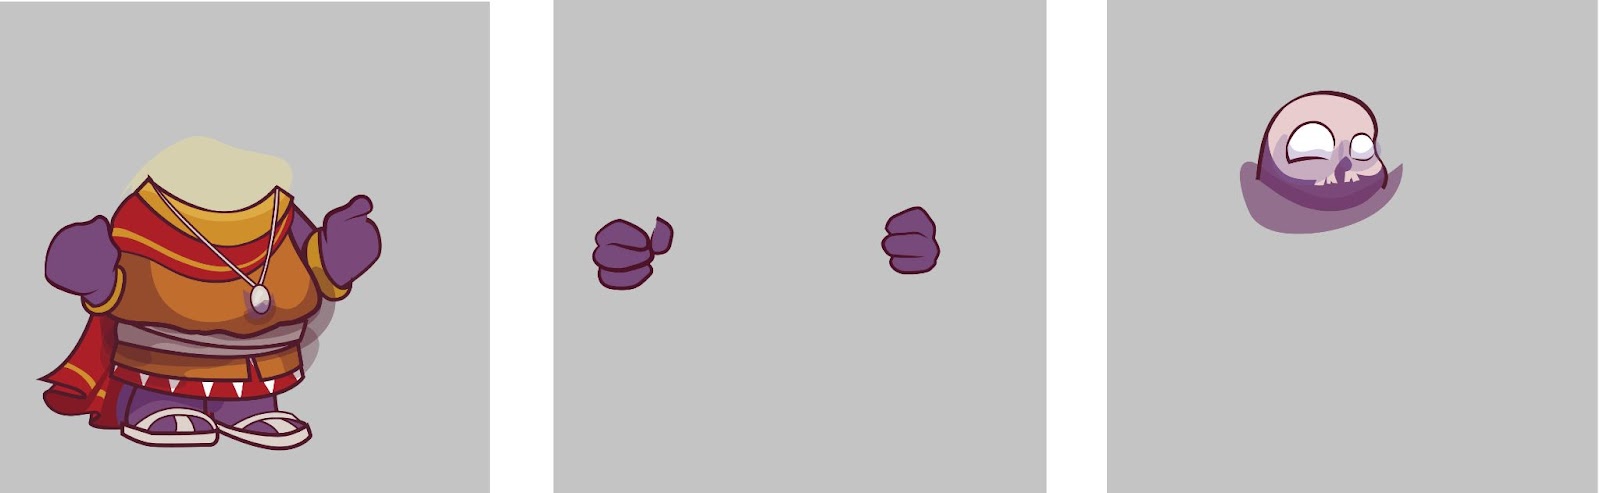
Here we have a Chunky holding a flag, the flag to be generated and exported to the exact location where it will be equipped. In this case we will need 3 files:
The preview image: which will be shown in our inventory and used as the main image to display the NFT individually. (second image).
Image to equip: these are 2 images, which can be PNG or SVG, depend on the base type you choose, showing the element in the exact space in which it should appear once equipped on the main image. (third and fourth images).
If you don’t use a preview image for your items, another image will automatically be chosen as thumb.
Thumb is not limited to PNG, but could also be an SVG or JPEG.
How the index or Z works?(Z is the JSON tag code)
The concept is very simple: an element with index 2 will be displayed above an element with index 1, and below an element with index 3.
When minting files, it is necessary to give this value to define the display order.
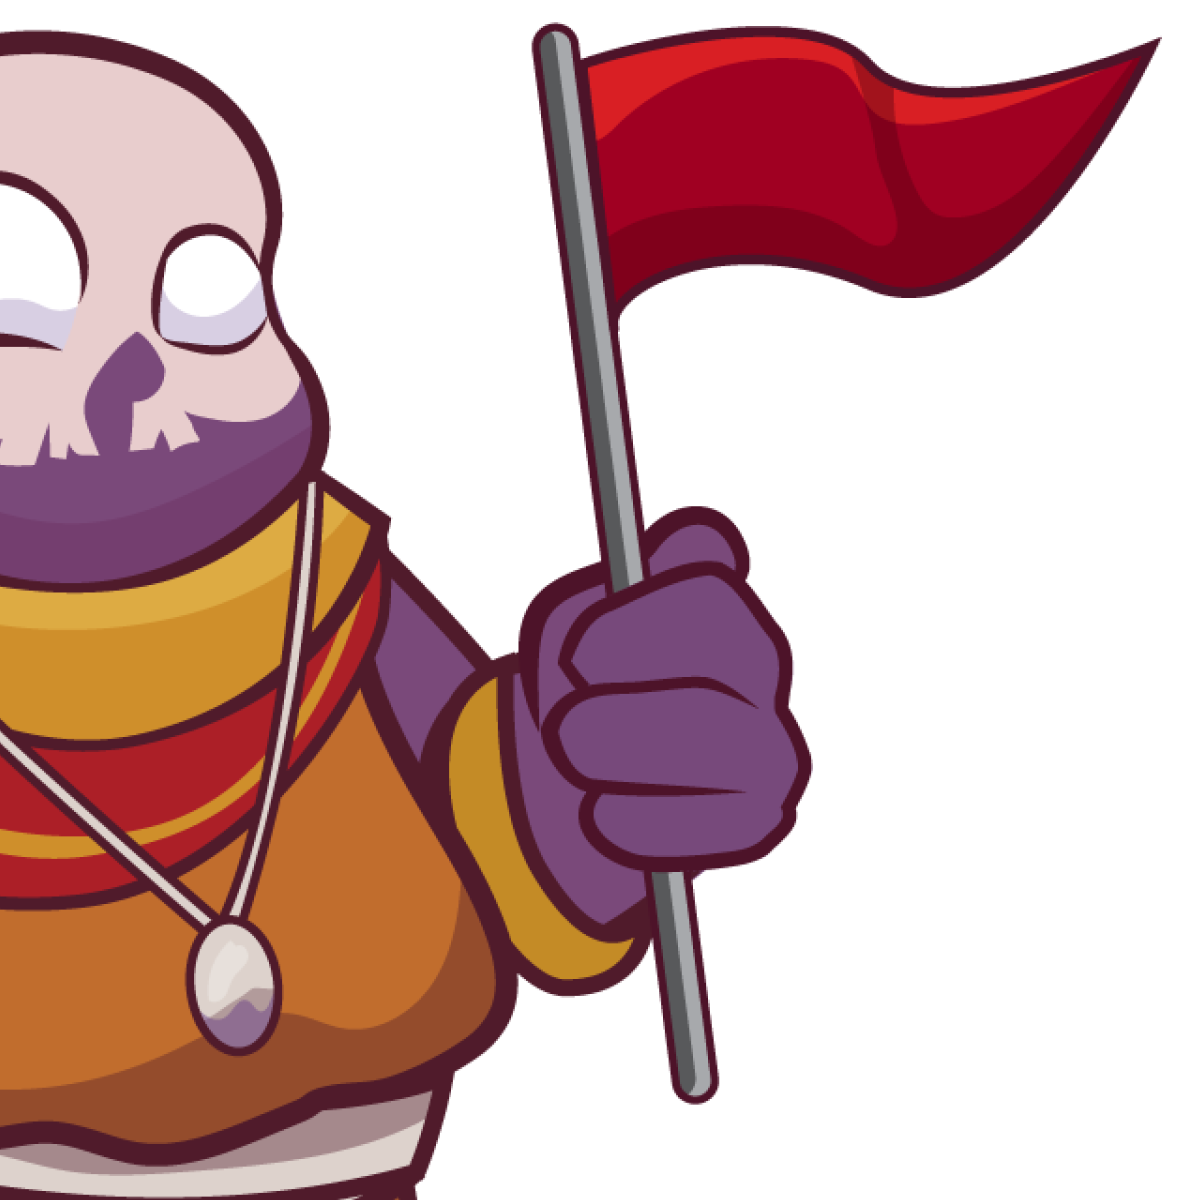
To achieve the result of making Chunky hold the flag, the index value must be given correctly:
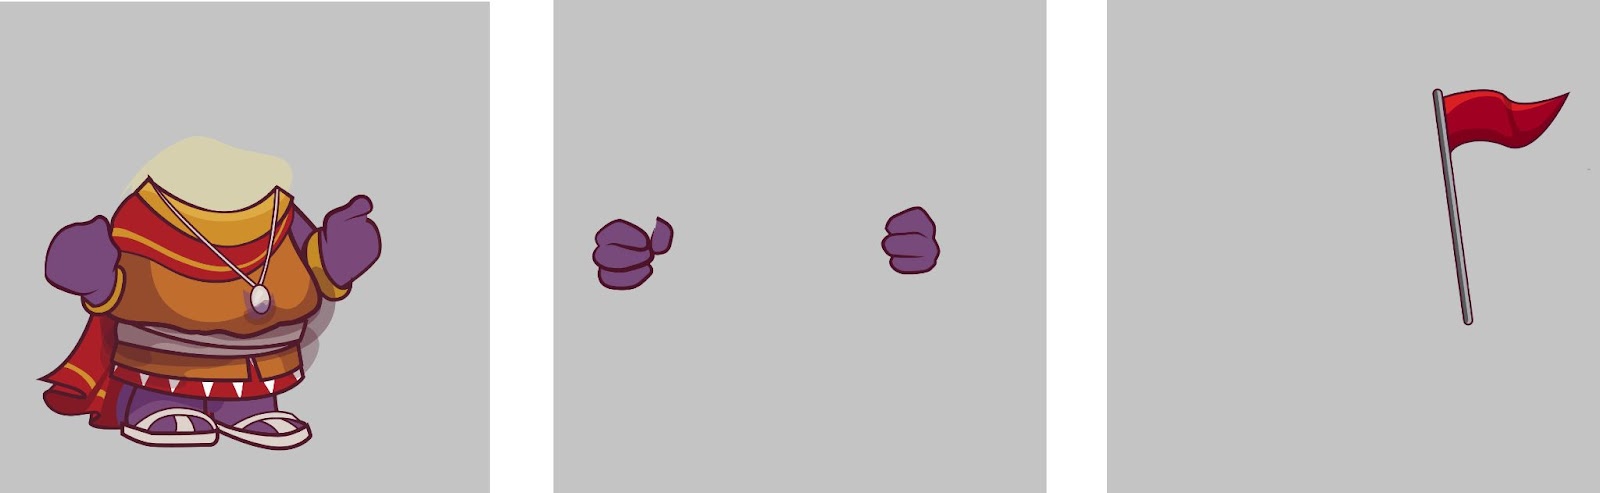
- Index body = 0
- Index hands = 2
- Index flag = 1
Then the images will be rendered in order of index, so: body → flag → hands. In this way is created the effect of the hand holding the flag.
5. File types
As far as images are concerned, the file types are SVG, PNG and JPG. The type you choose for the Base need to be the same for the Items. The other important thing is to understand how they will be positioned on the base. So having a transparent background could be essential.
6. Examples of projects
A complex example can be seen in the creation of Roben Topia, with the Mushroom Topia collection.
Here Ruben and the team offer a primary NFT with another artwork that you can use to equip inside a third NFT called a Mirror, which represents his Base, Mirror is in another collection.
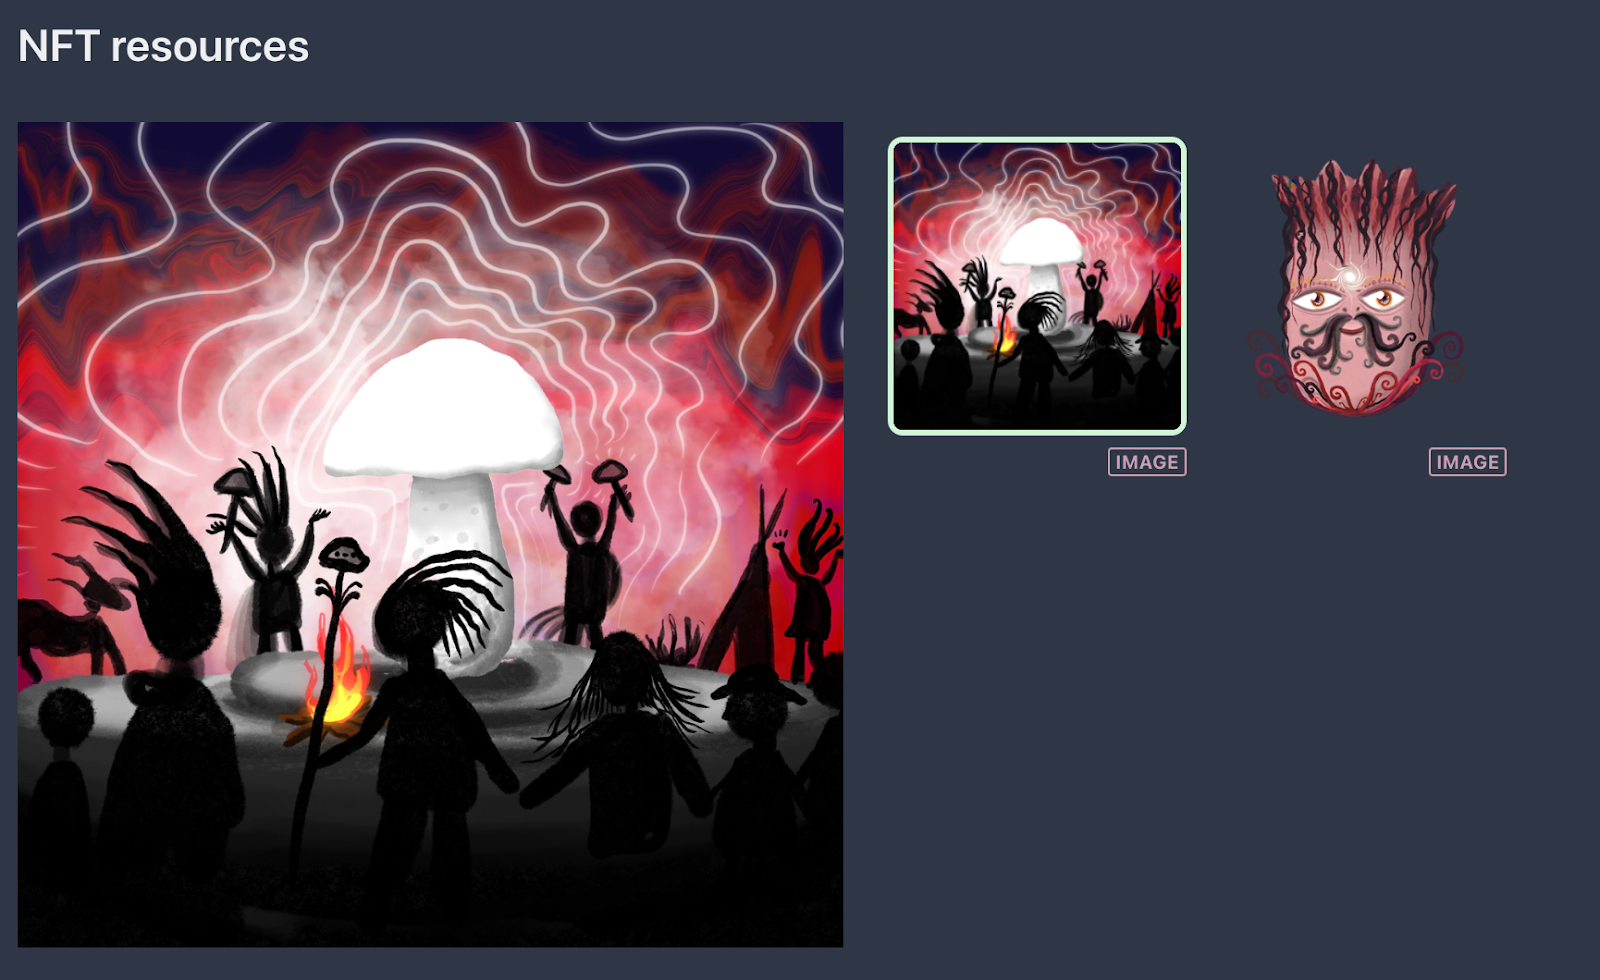
We can send this first NFT to the Mirror NFT. When we open the mirror's inventory we will see only the secondary NFT equitable within its base.
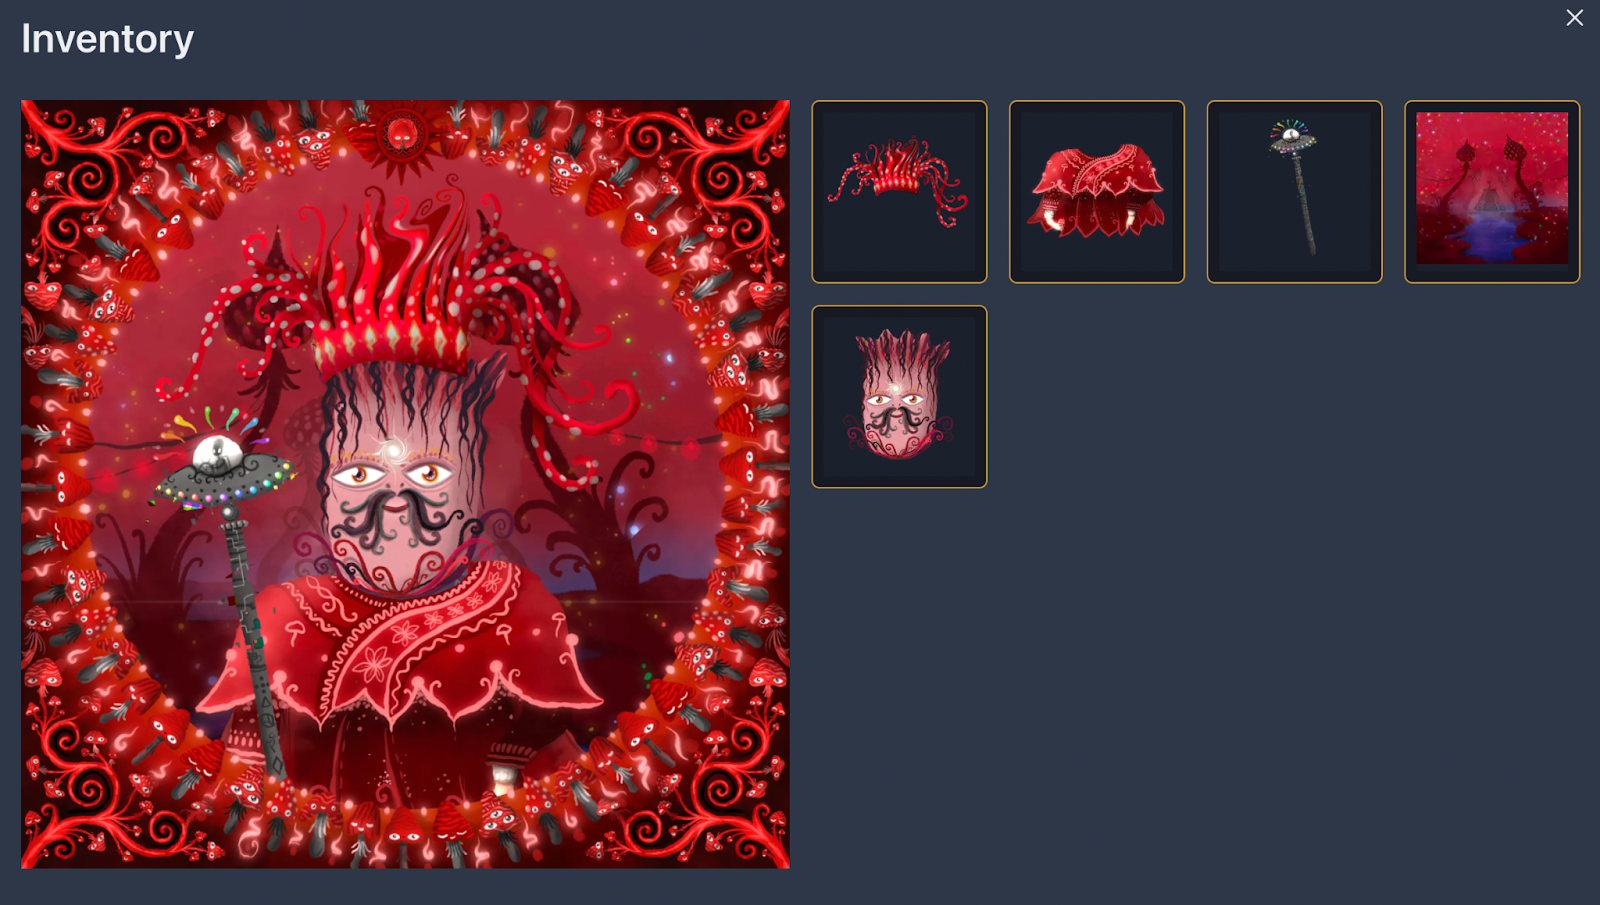
In this collection, using 5 items will create an additional exclusive PFP.
The Mushroom Topia collection does not end here, it has many other features, such as music tracks and videos. I invite you to explore them!
Another great example is the Donkey. This collection is a masterfully realised 3D. Donkeys are composed of several parts, each of which is an independent collection of objects.
In the Donkey collection, it is very intuitive to understand all the various parts that make up the final piece. Thanks to the accurate graphics, the details of the NFTs can be appreciated very much.
Another great project to study and study are the Neon Crisis Posters.
This project is the first to use the new Smart Contract Remark 2.0 in EVM, and they did a great job of using all the features of the Remark protocol.
In one NFT we have:
- One mobile phone cover
- High resolution jpeg poster and media
- An audio track (very nice) in 2 qualities
- A written story
- One browser game
I know is crazy.
Other projects to be explored:
Evrloot is an immersive experience, packaged into a low-touch game with composable RMRK NFTs at its core. Rooted in dark fantasy, inspired by classic RPGs like Diablo II or Dark Souls.
Stamp For Ukraine - Simple project
Stamp For Ukraine is a simple project involving a collection of stamps with a book in which to equip the stamps. The book is the base while the stamps are the itmes of the base, but also individual NFTs.
Chaos Collective Volume 1 Remix - Music project
Chaos Collective Volume 1 Remix is a music collection, where they have created a real CD consisting of several tracks and a cover which itself is a nested NFT.
Governance Participation Rewarder
This project aims to encourage participation in Kusama Governance. Each time you vote on a referendum, you get an NFT item added to your NFT shelf. These NFTs can be equipped into the 'decoration' slot of your Shelf to customize its look.
Tricky RMRK2 Experience - Complete project
Tricky RMRK2 Experience has a wide range of examples of how the remark 2.0 protocol works, with comprehensive captions and all the case studies you could make.
Happy Creation 2.0 to all!